There is a subtle shift in the air when winter starts to fade. You notice it in the way the light lingers in your living room a little longer each afternoon, but your plants usually feel it before you do. This period is more than just a change in weather; it’s a wake-up call for your indoor garden. Understanding the winter-to-spring plant transition is the difference between a plant that just survives and one that truly thrives.
One of the most frequent questions we hear during this time is: when to repot plants after winter? Repotting isn't just about giving a plant a bigger home. It’s about refreshing the foundation of its health. In the wild, spring rains and warming soil provide a natural boost. Indoors, we have to recreate that momentum.
In this guide, we’ll walk through how to handle the winter-to-spring transition so you can give your greenery the best start possible for the growing season.
Why This Transition is the "Goldilocks" Moment
During the winter, most houseplants go into a quiet phase. Their growth slows down, and they require less water and food. As the sun gets stronger in March and April, their metabolism kicks back into gear.
Spring is widely considered the best time to repot plants because they are about to enter their most active growth phase. If you repot now, the plant has the energy to grow new roots into the fresh soil almost immediately. This helps them recover from the move much faster than they would in the middle of a dark December. For anyone looking at seasonal plant care, this window is your most important opportunity.
Signs Your Plant is Ready for a Change
Before you start moving every plant into new plant pots, take a moment to observe them. Not every plant needs a new home every year. However, there are a few unmistakable signs that your plant is cramped:
- The Root Escape: If you see roots peeking out of the drainage holes at the bottom or swirling around the top of the soil, the plant is "root-bound." It has run out of room to move.
- Water Issues: Have you noticed that when you water, the liquid runs straight through to the saucer without soaking in? This usually means the roots have replaced most of the soil, leaving nothing to hold onto the moisture.
- Salt Buildup:Over time, minerals from tap water and fertilizers build up on the edges of ceramic planters, appearing as a white, crusty residue. This can eventually burn the roots, making a soil refresh necessary.
- The Lean: If a plant has become top-heavy and starts tipping over its current indoor planters, it needs a wider, heavier base for stability.
Choosing the Right Modern Planters for Repotting
The vessel you choose is just as important as the soil you put inside it. At Plantatorem, we focus on contemporary planters that bridge the gap between high-end design and practical horticulture.
Minimalist and Sleek Designs
For those who prefer a clean, gallery-like feel in their home, minimalist planters are the way to go. The Cylinder Planter stands out because its deep, straight sides give roots plenty of space to stretch out without sacrificing that timeless, modern look. It’s a go-to option for indoor gardening ideas where clean lines and a simple silhouette take center stage.
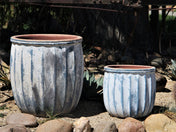
Natural Textures and Tones
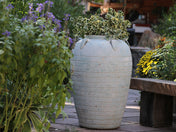
If you prefer a more organic vibe, try moving your plants into a vessel with a bit more soul. The Ridge Stone Planter has a textured, earthy presence that pairs perfectly with the vibrant green of a fern or philodendron. If you want something that truly commands attention, the Nigerian Jar adds a handmade, artisanal feel to a room, showing that decorative planters really can double as sculpture.
Steps To Repot a Plant Correctly
Once you’ve confirmed it’s time for the repotting your plants, follow these steps to make the move as easy as possible for your greenery.
Water your plant well a day or two before you plan to move it. Damp roots are more flexible and less likely to break during the transition.
- The One-Size Rule: Don't be tempted to put a small plant in a massive pot. Too much extra soil holds too much water, which can lead to root rot. Generally, you want a pot that is only 1-2 inches wider in diameter. If you are working with small succulents or cuttings, a Handthrown Bowl or the Hand-Thrown Smooth Bowls Set of 4 provides the perfect shallow environment they prefer.
- Removal: Turn the plant sideways, place your hand over the soil surface with the plant stem between your fingers, and gently ease the pot away. If it’s stuck, tap the sides of the pot to loosen it.
- Root Inspection: Gently tease the roots if they are growing in a tight circle. This "unwinding" tells the roots they can now grow outward into the new soil.
- The Setup: Place a layer of fresh potting mix in the bottom of your new modern planters. Position the plant so it sits at the same depth it was in the old pot. Fill the gaps with soil, pressing down lightly. Not too hard, as you want to keep the soil airy.
Managing Post-Repotting Stress
Even with the best indoor plant care, moving to a new pot is a bit of a shock. For plants that are particularly sensitive to moisture changes, the Jewel Self-Watering Planter can be a lifesaver during the winter to spring plant transition. It allows the plant to drink at its own pace while it establishes its new root system.
Keep your newly repotted plant in a spot with bright, indirect light, and avoid fertilizing for at least four to six weeks. The fresh potting mix usually has enough nutrients to keep the plant happy while it settles in.
Final Thoughts
Taking the time to focus on winter to spring plant care ensures that your indoor garden is ready for the long days of summer ahead. By recognizing the signs of a cramped plant and choosing the rightgarden planters, you’re investing in the longevity of your green companions.
Whether you are looking for minimalist planters to sharpen up your office or bold decorative planters for your living room, remember that the best time to start is now, while the plants are eager to grow.
FAQ's
Is it ever too early to repot?
Is it ever too early to repot?
Do I have to use a pot with a drainage hole?
Do I have to use a pot with a drainage hole?
For the health of the plant, yes. If you fall in love with a decorative pot that doesn't have a hole, use it as a "cachepot." Keep the plant in a plain plastic nursery liner with holes, and set that inside the decorative one.
How do I know if I should just refresh the soil instead of getting a bigger pot?
How do I know if I should just refresh the soil instead of getting a bigger pot?
If the plant isn't root-bound but the soil looks gray, dusty, or compacted, you don't need a bigger pot. Just remove the top few inches of soil and replace it with fresh potting mix. This is a great home gardening tip for plants that have already reached their maximum size for your space.
What kind of soil should I use
What kind of soil should I use
It’s tempting to just grab some dirt from the backyard, but garden soil is usually too dense for containers and can introduce pests into your home. Instead, look for a dedicated indoor potting mix. You want something that includes perlite or vermiculite; these materials are essential because they prevent the soil from packing down too tightly, allowing the roots to actually breathe.